Android开发中,借助于 Intent,可以方便地调用 Android 系统的照相机程序进行拍照。但是需要声明摄像头的使用权限,即在 AndroidManifest.xml 文件中添加如下代码:
<uses-permission android:name="android.permission.CAMERA"/>
<uses-feature android:name="android.hardware.camera"/>
实例 CameraDemo 演示了通过 Intent 调用系统的拍照程序并返回照片的过程,该实例运行效果如图 1 所示。
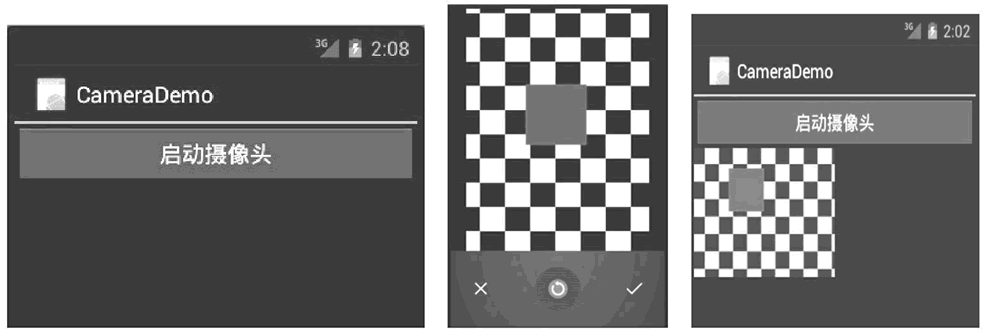
图 1 CameraDemo实例运行效果
当单击“启动摄像头”按钮时,启动 Android系统自带的照相机应用程序进行拍照,并将拍摄的照片显示到 ImageView 组件中。
实例 CameraDemo 中的 main.xml 代码如下:
<?xml version="1.0" encoding="utf-8"?>
<LinearLayout xmlns:android="http://schemas.android.com/apk/res/android"
android:layout_width="fill_parent"
android:layout_height="fill_parent"
android:orientation="vertical">
<Button
android:id="@+id/button1"
android:layout_width="wrap_content"
android:layout_height="wrap_content"
android:text="@string/camera" />
<ImageView
android:id="@+id/imageview"
android:layout_width="wrap_content"
android:layout_height="wrap_content" />
</LinearLayout>
在实例 CameraDemo 中的 AndroidManifest.xml 代码如下:
<?xml version="1.0" encoding="utf-8"?>
<manifest xmlns:android="http://schemas.android.com/apk/res/android"
package="introduction.android.receivemessagedemo"
android:versionCode="1"
android:versionName="1.0">
<uses-sdk android:minSdkVersion="14" />
<uses-permission android:name="android.permission.CAMERA" />
<uses-feature android:name="android.hardware.camera" />
<application
android:allowBackup="true"
android:icon="@mipmap/ic_launcher"
android:label="@string/app_name"
android:roundIcon="@mipmap/ic_launcher_round"
android:supportsRtl="true"
android:theme="@style/AppTheme">
<activity android:name=".MainActivity">
<intent-filter>
<action android:name="android.intent.action.MAIN" />
<category android:name="android.intent.category.LAUNCHER" />
</intent-filter>
</activity>
</application>
</manifest>
在实例 CameraDemo 中的 CameraDemoActivity.java 代码如下:
import android.app.Activity;
import android.content.Intent;
import android.graphics.Bitmap;
import android.os.Bundle;
import android.provider.MediaStore;
import android.util.Log;
import android.view.View;
import android.view.View.OnClickListener;
import android.widget.Button;
import android.widget.ImageView;
public class MainActivity extends Activity {
/**
* Called when the activity is first created.
*/
private ImageView imageview;
private Button btn;
@Override
public void onCreate(Bundle savedInstanceState) {
super.onCreate(savedInstanceState);
setContentView(R.layout.activity_main);
imageview = (ImageView) findViewById(R.id.imageview);
btn = (Button) findViewById(R.id.button1);
btn.setOnClickListener(new OnClickListener() {
public void onClick(View v) {
// TODO Auto-generated method stub
try {
Intent i = new Intent(MediaStore.ACTION_IMAGE_CAPTURE);
startActivityForResult(i, 1);
} catch (Exception e) {
Log.d("cameraDemo", e.toString());
}
}
});
}
protected void onActivityResult(int requestcode, int resultCode, Intent data) {
try {
if (requestcode != 1) {
return;
}
super.onActivityResult(requestcode, resultCode, data);
Bundle extras = data.getExtras();
Bitmap bitmap = (Bitmap) extras.get("data");
imageview.setImageBitmap(bitmap);
} catch (Exception e) {
Log.d("cameraDemo", e.toString());
}
}
}
在启动摄像头程序时,因为要传回拍摄的图像,所以调用了 Activity.startActivityForResult(Intent intent, int requestCode) 方法。
当 startActivityForResult() 方法启动的 Activity 正常结束时,会自动返回发出请求的 Activity,并且该方法会返回对应的 requestCode 值给 onActivityResult(int requestcode, int resultCode,Intent data) 方法,借此可以在请求 Activity 和发出请求的 Activity 之间进行数据传递。本实例借助于这一特点传回了 Android 系统照相机程序拍摄的照片。


 B2C电商系统商城源码支持pC+小程序+公众号+H5可打包App源...
 原生开发淘宝客App,Android+ios独立开发,全开源支持二...
 知识付费系统在线教育平台源码+题库系统源码,PC+公众号商业授权...
 B2C单商户电商系统源码部署小程序+公众号+H5+App源码...
 教育知识付费系统源码带题库功能商业授权公众号+H5源码...
