首先我们来看一下 Android N 支持的视频文件有哪些。Android N 支持的视频格式下表所示。
Android N 支持的视频文件

与音频播放相比,视频播放需要使用视觉组件将影像显示出来。
在 Android SDK 中提供了多种播放视频文件的方法。例如,可以用 VideoView 或 SurfaceView 来播放视频,其中使用 VideoView 组件播放视频最为方便。
实例 VideoPlayDemo 演示了使用 android.widget.VideoView 组件进行视频播放的方法,运行效果如图 1 所示。
实例 VideoPlayDemo 中含有两个 Activity,其中 PlayVideo 含有 VideoView 组件对象,用于播放视频。视频文件存放在 SD 卡中,路径为“Movies/movie.3gp”。而 VideoPlayAcitvity 为主 Activity,用于启动 PlayVideo。
实例 VideoPlayDemo 中 MainActivity.java 的代码如下:
package introduction.android.videoplaydemo;
import android.app.Activity;
import android.content.Intent;
import android.os.Bundle;
import android.view.View;
import android.view.View.OnClickListener;
import android.widget.Button;
public class MainAcitvity extends Activity {
/**
* Called when the activity is first created.
*/
private Button buttonOl;
@Override
public void onCreate(Bundle savedInstanceState) {
super.onCreate(savedInstanceState);
setContentView(R.layout.main);
button01 = (Button) findViewById(R.id.buttonOl);
button0l.setOnClickListener(new buttonListener());
}
class buttonListener implements OnClickListener {
@Override
public void onClick(View v) {
// TODO Auto-generated method stub
Intent intent = new Intent(MainActivity.this, PlayVideo.class);
MainAcitvity.this.startActivity(intent);
}
}
}
实例 VideoPlayDemo 中 PlayVideo.java 的代码如下:
package introduction.android.videoplaydemo;
import android.app.Activity;
import android.media.MediaPlayer;
import android.net.Uri;
import android.os.Bundle;
import android.widget.MediaController;
import android.widget.Toast;
import android.widget.VideoView;
public class PlayVideo extends Activity {
private VideoView videoView;
private MediaController mc;
private String path;
@Override
public void onCreate(Bundle savedInstanceState) {
super.onCreate(savedInstanceState);
setContentView(R.layout.other);
videoView = (VideoView) this.findViewById(R.id.videoView);
path = "sdcard/Movies/movie.3gp";
mc = new MediaController(this);
videoView.setMediaController(mc);
videoView.setVideoPath(path);
videoView.setOnCompletionListener(new MediaPlayer.OnCompletionListener() {
@Override
public void onCompletion(MediaPlayer argO) {
// TODO Auto-generated method stub
finish();
}
});
videoView.requestFocus();
videoView.start();
}
}
其中,MediaController 类为 Android SDK 提供的视频控制器,用于显示播放时间,对播放视频进行控制。
通过 VideoView 类的 setMediaController() 方法可以将视频控制器和 VideoView 类结合在一起,对 VideoView 中播放的视频进行控制,大大降低了编码强度。
由于要播放的视频为放置在 SD 卡中的“Movies/movie.3gp”文件,VideoView 组件使用 setVideoPath() 方法即可指定该文件,并通过 start() 方法进行播放。
videoView.setOnCompletionListener(new OnCompletionListener(){
@Override
public void onCompletion(MediaPlayer argO) {
// TODO Auto-generated method stub
finish();
}
})
这行代码指定了 videoView 组件的视频播放完成事件的触发器,当视频播放完成后,关闭当前 Activity。
PlayVideo 使用的布局为 R.layout.other,该布局中含有 VideoView 组件,其所对应的 XML 文件 other.xml 的代码如下:
<?xml version="1.0" encoding="utf-8"?>
<LinearLayout xmlns:android="http://schemas.android.com/apk/res/android"
android:layout_width="fill_parent"
android:layout_height="fill_parent"
android:orientation="vertical">
<VideoView
android:id="@+id/videoView"
android:layout_width="320px"
android:layout_height="240px" />
</LinearLayout>
实例 VideoPlayDemo 中 AndroidManifest.xml 文件的代码如下:
<?xml version="1.0" encoding="utf-8"?>
<manifest xmlns:android="http://schemas.android.com/apk/res/android"
package="introduction.android.videoplaydemo">
<application
android:allowBackup="true"
android:icon="@mipmap/ic_launcher"
android:label="@string/app_name"
android:roundIcon="@mipmap/ic_launcher_round"
android:supportsRtl="true"
android:theme="@style/AppTheme">
<activity android:name=".MainActivity">
<intent-filter>
<action android:name="android.intent.action.MAIN" />
<category android:name="android.intent.category.LAUNCHER" />
</intent-filter>
</activity>
<activity android:name="introduction.android.playvideo.PlayVideo" />
</application>
</manifest>
此外,VideoView 也支持网络流媒体的播放,只需将 VideoView 的 setVideoPath() 方法替换为 setViewURI(),并指定对应的 URI 即可。
需要注意的是,并不是所有的 MP4 和 3GP 文件都可以被 VideoView 组件播放,只有使用 progressive streamable 模式转化的影片才可以被播放。
播放网络流媒体文件时,需要在 AndroidManifest.xml 文件中添加相应权限:
<uses-permission android:name="android.permission.INTERNET"/>
<uses-permission android:name="android.permission.WAKE_LOCK"/>
android.permission.INTERNET 权限使当前应用程序可以访问网络资源;
android. permission.WAKE_LOCK 权限使当前应用程序运行时,手机不会进入休眠状态,以便于视频播放。
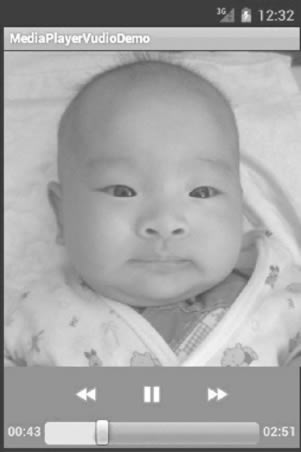
使用 SurfaceView 组件播放视频的方法也不复杂,而且更加灵活。
实例 MediaPlayerVideoDemo 演示了使用 SurfaceView 和 MediaPlayer 组件播放视频的方法,运行效果如图 2 所示。

图 2 MediaPlayerVideoDemo的运行效果
对应的布局文件 main.xml 的内容如下:
<?xml version="1.0" encoding="utf-8"?>
<LinearLayout xmlns:android="http://schemas.android.com/apk/res/android"
android:layout_width="fill_parent"
android:layout_height="fill_parent"
android:orientation="vertical">
<SurfaceView
android:id="@+id/surfaceView1"
android:layout_width="fill_parent"
android:layout_height="wrap_content"
android:layout_weight="1.01" />
<LinearLayout
android:id="@+id/linearLayout1"
android:layout_width="match_parent"
android:layout_height="wrap_content"
android:gravity="center">
<Button
android:id="@+id/button1"
android:layout_width="wrap_content"
android:layout_height="wrap_content"
android:text="播放" />
<Button
android:id="@+id/button2"
android:layout_width="wrap_content"
android:layout_height="wrap_content"
android:text="暂停" />
<Button
android:id="@+id/button3"
android:layout_width="wrap_content"
android:layout_height="wrap_content"
android:text="重置" />
<Button
android:id="@+id/button4"
android:layout_width="wrap_content"
android:layout_height="wrap_content"
android:text="停止" />
</LinearLayout>
</LinearLayout>
实例 MediaPlayerVideoDemo 的配置文件 AndroidManifest.xml 的内容如下:
<?xml version="1.0" encoding="utf-8"?>
<manifest xmlns:android="http://schemas.android.com/apk/res/android"
package="introduction.android.videoPlayDemo"
android:versionCode="1"
android:versionName="1.0">
<uses-sdk android:minSdkVersion="14" />
<application
android:icon="@drawable/ic_launcher"
android:label="@string/app_name">
<activity
android:name=".VideoPlayDemoActivity"
android:label="@string/app_name">
<intnt-filter>
<action android:name="android.intent.action.MAIN" />
<category android:name="android.intent.category.LAUNCHER" />
</intnt-filter>
</activity>
</application>
</manifest>
实例 MediaPlayerVideoDemo 中的主 Activity 文件MainActivity.Java 的代码如下:
package introduction.android.videoplaydemo;
import java.io.IOException;
import android.app.Activity;
import android.media.AudioManager;
import android.media.MediaPlayer;
import android.os.Bundle;
import android.util.Log;
import android.view.SurfaceHolder;
import android.view.SurfaceView;
import android.view.View;
import android.view.View.OnClickListener;
import android.widget.Button;
public class MainActivity extends Activity {
/**
* Called when the activity is first created.
*/
private Button playbtn;
private Button pausebtn;
private Button replaybtn;
private Button stopbtn;
private SurfaceView surview;
private SurfaceHolder surHolder;
private MediaPlayer mp;
private String path = "sdcard/movies/movie.3gp";
protected boolean pause = false;
@Override
public void onCreate(Bundle savedInstanceState) {
super.onCreate(savedInstanceState);
setContentView(R.layout.main);
surview = (SurfaceView) this.findViewById(R.id.surfaceView1);
surHolder = surview.getHolder();
surHolder.setType(SurfaceHolder.SURFACE_TYPE_PUSH_BUFFERS);
mp = new MediaPlayer();
mp.setOnCompletionListener(new MediaPlayer.OnCompletionListener() {
@Override
public void onCompletion(MediaPlayer mp) {
// TODO Auto-generated method stub
Log.i("mediaplayer", "播放完成");
}
});
playbtn = (Button) this.findViewById(R.id.buttonl);
playbtn.setOnClickListener(new OnClickListener() {
@Override
public void onClick(View argO) {
// TODO Auto-generated method stub
if (!pause) {
//开始播放
mp.setAudioStreamType(AudioManager.STREAM_MUSIC);
mp.setDisplay(surHolder);
try {
mp.setDataSource(path);
mp.prepare();
mp.start();
} catch (IOException e) {
// TODO Auto-generated catch block
e.printStackTrace();
}
} else {
//暂停播放
mp.start();
pause = false;
}
}
});
pausebtn = (Button) this.findViewById(R.id.button2);
pausebtn.setOnClickListener(new OnClickListener() {
//暂停播放
@Override
public void onClick(View argO) {
// TODO Auto-generated method stub
if (mp != null) {
pause = true;
mp.pause();
}
}
});
replaybtn = (Button) this.findViewById(R.id.button3);
replaybtn.setOnClickListener(new OnClickListener() {
//重新播放
@Override
public void onClick(View argO) {
// TODO Auto-generated method stub
if (mp != null) {
mp.seekTo(0);
}
}
});
stopbtn = (Button) this.findViewById(R.id.button4);
stopbtn.setOnClickListener(new OnClickListener() {
@Override
public void onClick(View argO) {
// TODO Auto-generated method stub
if (mp != null) {
mp.stop();
mp.release();
}
}
});
}
}


 B2C电商系统商城源码支持pC+小程序+公众号+H5可打包App源...
 原生开发淘宝客App,Android+ios独立开发,全开源支持二...
 知识付费系统在线教育平台源码+题库系统源码,PC+公众号商业授权...
 B2C单商户电商系统源码部署小程序+公众号+H5+App源码...
 教育知识付费系统源码带题库功能商业授权公众号+H5源码...
